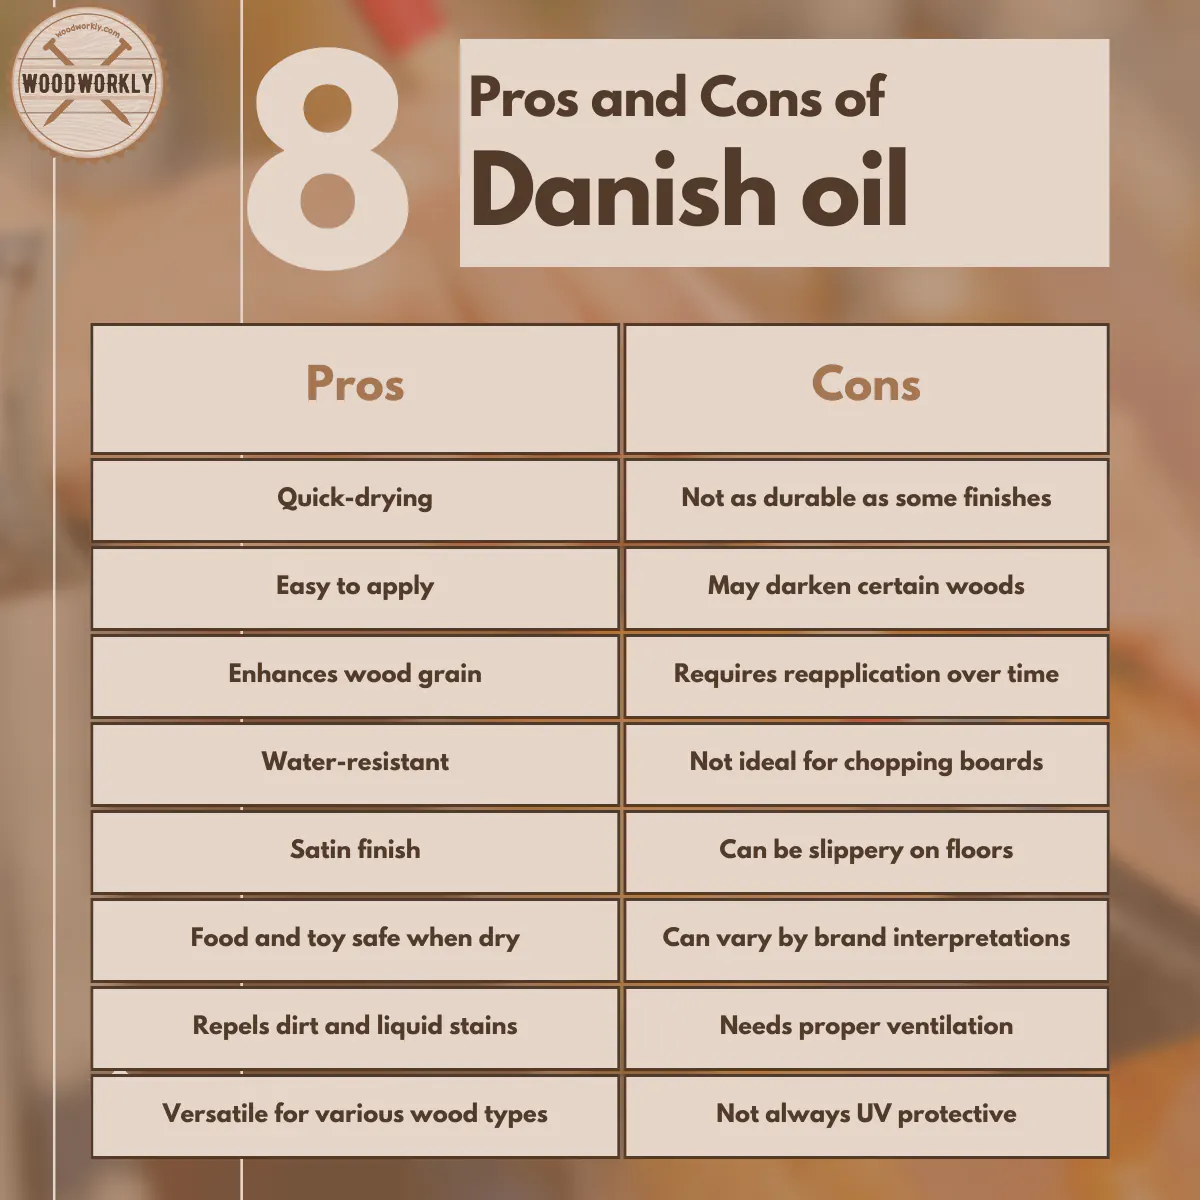
Danish oil is a favorite finish among woodworkers and DIY enthusiasts. People love it for its natural look, easy application, and versatility. However, Danish oil is not perfect. Under its smooth, hand-rubbed appearance, there are several disadvantages that often go unnoticed by beginners and even some experienced users.
If you are considering Danish oil for your next project, understanding its downsides can help you make better choices and avoid disappointing results.
This article explores the disadvantages of Danish oil in depth. You’ll discover not only the obvious weaknesses, but also hidden pitfalls that may only appear after weeks or months of use. Whether you’re finishing a tabletop, restoring a chair, or working on fine cabinetry, knowing these facts will save you time, money, and frustration.
What Is Danish Oil?
Before diving into the disadvantages, it’s important to understand what Danish oil is. Danish oil is a blend of oil (usually tung or linseed), varnish, and mineral spirits. This mix creates a finish that penetrates wood fibers and forms a thin protective layer on the surface. It enhances the color and grain of wood, giving it a low-sheen, hand-finished look. Danish oil is commonly used on furniture, cutting boards, floors, and crafts.
Limited Surface Protection
One of the main drawbacks of Danish oil is its limited durability. While it does protect wood from moisture and minor wear, it cannot withstand heavy use or harsh conditions. Danish oil forms a thin film, much thinner than polyurethane or lacquer. This means it offers little resistance to:
- Scratches and dents
- Water rings or spills
- Heat from cups or dishes
- Chemicals and cleaning products
If you want a finish that can handle kitchen use, children’s play, or frequent cleaning, Danish oil may disappoint. Tabletops, countertops, and floors finished with Danish oil often show wear after a few months, especially in high-traffic areas. For heirloom or display pieces, this is less of an issue, but for daily-use furniture, it can be a serious problem.

Credit: www.youtube.com
Frequent Maintenance Required
Danish oil requires ongoing maintenance to keep wood looking good and protected. Unlike hard finishes, it doesn’t create a thick, long-lasting shield. Over time, the protective layer wears off, especially on surfaces that are touched or cleaned often. You’ll need to:
- Reapply Danish oil every 6–12 months on high-use surfaces.
- Clean the wood gently with a soft cloth—harsh cleaners remove the finish.
- Buff the surface to restore its luster.
Neglecting these steps can lead to dull, dry, or stained wood. Many beginners underestimate this maintenance, expecting Danish oil to behave like varnish or polyurethane.
Poor Water Resistance
Another significant disadvantage is poor water resistance. Danish oil repels small spills at first, but it is not waterproof. Water droplets left on the surface can soak into the wood, causing:
- White spots or watermarks
- Swelling or warping (on softwoods or thin veneers)
- Mold or mildew growth if moisture persists
In kitchens, bathrooms, or outdoor settings, this weakness becomes obvious. Even a sweaty glass can leave a ring if not wiped up quickly. For areas exposed to frequent moisture, Danish oil is not the best choice.
Inconsistent Formulas
Danish oil is not a single, regulated product. Each manufacturer uses a different formula. Some brands use more oil, others more varnish or solvent. The ratio affects drying time, color, gloss, and durability. As a result:
- Results can vary widely from brand to brand.
- You might get a shiny finish from one, and a matte finish from another.
- Some formulas dry hard, while others stay tacky.
This inconsistency confuses beginners and makes it hard to match finishes on different projects. Always test the product on scrap wood first, and keep notes about the brand and batch.
Slow Drying Time
Compared to modern finishes, Danish oil can have a slow drying time. Most products require at least 6–24 hours between coats, and full curing may take up to a week. Factors that affect drying include:
- High humidity or low temperature (slows drying)
- Thick application (oil stays sticky)
- Poor ventilation
If you rush the process, the finish can become gummy or attract dust and dirt. For those who want a quick project turnaround, Danish oil may frustrate. Polyurethane or water-based finishes dry much faster.
Not Food-safe Without Curing
Many people use Danish oil on cutting boards, kitchen utensils, or children’s toys, thinking it is food-safe. However, this is only true after the oil has fully cured—a process that can take 7–30 days. During this period, the finish may:
- Transfer chemicals to food
- Have an odor or taste
- Leave residue on hands or surfaces
This waiting period is often skipped, especially by beginners. If you need a food-safe finish immediately, choose mineral oil or a product labeled specifically for food contact.
Limited Gloss And Color Options
Danish oil provides a natural, low-sheen finish. While this is attractive for many projects, it does not offer much variety. Most brands come in only a few color options—natural, golden oak, or walnut. You won’t find high-gloss, satin, or deep colors like with stains or lacquers. This means:
- Less flexibility in matching existing decor or woodwork
- Harder to achieve dramatic or custom looks
- May not highlight grain as strongly as some other finishes
If you want a specific color or sheen, Danish oil may not deliver what you need.
Not Suitable For All Woods
Danish oil works best on open-grain woods like oak, ash, or walnut. On dense or oily woods, such as maple, cherry, teak, or rosewood, Danish oil can:
- Fail to penetrate well
- Leave a blotchy or uneven finish
- Remain sticky for weeks
Some woods, especially those with high natural oil content, will not absorb Danish oil properly. This is a common mistake: users apply more oil, hoping to improve the look, but the result is a gummy, unattractive surface.
Fire Risk From Oily Rags
A hidden danger of Danish oil is the fire risk from oily rags. As Danish oil dries, it undergoes a chemical reaction called oxidation. Rags soaked in oil can heat up and spontaneously combust if left in a pile. This is not just theory—many workshop fires have started this way.
To prevent this, you should always:
- Lay oily rags flat to dry, outside and away from buildings
- Store used rags in a sealed, water-filled metal container until disposal
Many beginners do not know this risk, but it’s critical for safety.
Weak Resistance To Chemicals
Danish oil offers poor resistance to household chemicals. Spilled alcohol, vinegar, or cleaners can damage the finish, causing:
- Cloudiness
- Stripping of protection
- Stains or discoloration
This is a problem for kitchen tables, desks, or workbenches. Even mild products like hand sanitizer can damage Danish oil finishes.
Difficult To Repair Seamlessly
When Danish oil wears or gets damaged, fixing it is not always simple. Small scratches or dry spots can be touched up, but deeper issues often require:
- Sanding back to bare wood
- Blending new oil into the old finish (which may look uneven)
- Repeating several coats to match the original look
Unlike film finishes, you cannot just patch a spot and have it blend perfectly. This makes repairs more visible, especially on lighter woods or large surfaces.
Short Shelf Life
Danish oil does not store well once opened. It starts to thicken, form a skin, or even turn rancid within a year of opening. Storing it in a hot garage or workshop speeds up this process. Old oil may:
- Dry very slowly
- Fail to cure
- Leave a tacky or uneven finish
To avoid waste, buy only what you need for a project, and seal containers tightly. Some users add marbles to the can to reduce air exposure, but this is only a partial solution.
Not Ideal For Outdoor Use
While some Danish oil brands claim to be suitable for outdoor wood, the reality is that weather resistance is low. Sunlight, rain, and temperature changes quickly break down the thin oil film, leading to:
- Fading and discoloration
- Peeling or flaking
- Mold and mildew growth
Wood treated with Danish oil outdoors often needs reapplication every few months—a high-maintenance task. For decks, garden furniture, or doors, specialized outdoor oils or sealers perform better.
Can Highlight Wood Flaws
Danish oil enhances the natural grain and color of wood. However, this also means it can make flaws more visible. Knots, mineral streaks, sapwood, or sanding marks will stand out, not blend in. Unlike paint or heavy stains, Danish oil offers little camouflage for:
- Uneven sanding
- Filler spots
- Minor cracks
If your wood surface is not perfectly prepared, Danish oil will show every imperfection.
Not A Buildable Finish
Some users want a glass-smooth, thick coating on their woodwork. Danish oil is a penetrating finish, not a buildable one. Multiple coats do not create a deep, protective film like varnish or polyurethane. After a few coats, excess oil just sits on the surface and stays sticky. This means:
- Limited improvement from extra coats
- No way to “build up” a finish for extra protection or gloss
- Risk of a tacky mess if too much oil is applied
For a thicker finish, you must switch to a true film-forming product.
Fumes And Ventilation Issues
Applying Danish oil releases volatile organic compounds (VOCs) and strong odors. In poorly ventilated spaces, these fumes can linger and cause:
- Headaches or nausea
- Irritation of eyes and lungs
- Risk to pets or children
While less toxic than some finishes, Danish oil still demands good airflow and safety precautions. Always work in a well-ventilated area and avoid open flames.
Cost Over Time
While a can of Danish oil seems affordable, the need for frequent reapplication and maintenance adds up over time. Compared to a hard-wearing finish that lasts years, Danish oil requires more product, more labor, and more time. For large projects or commercial work, this ongoing cost can outweigh the initial savings.
Inconsistent Results For Beginners
Many guides call Danish oil “foolproof,” but in reality, it’s easy to make application mistakes. Common problems include:
- Applying too much oil at once (leading to a sticky surface)
- Not wiping off excess oil (causing uneven sheen)
- Poor sanding or surface prep (resulting in blotchiness)
Beginners often expect perfect results on the first try and are disappointed when the finish looks dull or patchy.
Potential For Yellowing Over Time
Some Danish oil formulas—especially those based on linseed oil—can yellow or darken as they age. This is most noticeable on light-colored woods like maple or birch. The wood may develop a warm, amber tone, which is attractive to some but unwanted by others.
If you want a finish that stays clear, Danish oil may not be the best choice.
Not Environmentally Friendly
The solvents and chemicals in many Danish oil products are not eco-friendly. VOCs contribute to indoor air pollution, and disposing of oily rags requires special care. For those seeking a green alternative, pure natural oils (like tung or walnut oil) may be better.
Comparison: Danish Oil Vs. Other Finishes
To see how Danish oil stacks up against other wood finishes, consider this comparison:
| Finish Type | Protection Level | Maintenance Frequency | Water Resistance | Application Ease |
|---|---|---|---|---|
| Danish Oil | Low-Medium | 6–12 months | Poor | Easy |
| Polyurethane | High | 3–5 years | Excellent | Moderate |
| Lacquer | High | 3–5 years | Good | Moderate-Difficult |
| Tung Oil (Pure) | Medium | 12–18 months | Good | Easy |
Real-world Example: Kitchen Table
Imagine finishing a kitchen table with Danish oil. The first few weeks, the table looks warm and natural. But after daily use, you notice:
- Water rings from cups that don’t wipe away
- Small scratches from utensils
- A dull appearance in areas where people rest their arms
You reapply Danish oil, but the cycle repeats. After a year, you realize a harder finish would have saved you time and effort.
Common Mistakes When Using Danish Oil
- Applying too much oil—This leads to sticky, soft surfaces that never fully cure.
- Skipping sanding—Rough or uneven surfaces show through the finish.
- Not wiping off excess—Excess oil attracts dust and dries unevenly.
- Using on unsuitable woods—Oily or dense woods do not absorb Danish oil properly.
- Ignoring reapplication—Letting the finish wear away exposes bare wood.
Data: Reapplication Frequency
A survey of woodworking forums shows most users need to reapply Danish oil every 8–10 months on tabletops, and every 12–18 months on less-used furniture. In high-humidity homes, reapplication is needed even sooner.
Comparison: Oil Finishes
How Does Danish Oil Compare To Other Oil Finishes?
| Oil Type | Penetration | Durability | Gloss | Water Resistance |
|---|---|---|---|---|
| Danish Oil | Good | Low-Medium | Low | Poor |
| Linseed Oil (Boiled) | Good | Low | Low | Poor |
| Tung Oil (Pure) | Excellent | Medium | Low-Medium | Good |
| Teak Oil | Excellent | Medium | Low-Medium | Good |
Credit: woodworkly.com
Non-obvious Insights For Beginners
First, Danish oil’s appearance changes over time. The initial look might be beautiful, but after months of use, you may see color shifts, dullness, or the need for touch-ups.
Second, layering Danish oil over other finishes rarely works well. Danish oil needs to penetrate raw wood. If you try to use it on sealed or previously finished wood, it will not bond, and the finish may peel or stay sticky.
When Is Danish Oil Still A Good Choice?
Despite these disadvantages, Danish oil is popular for:
- Decorative projects that see little wear
- Woodturnings, carvings, or display pieces
- Woods with dramatic grain, where a natural look is desired
- Beginners who want an easy, wipe-on finish for their first projects
If you understand its limitations and plan for regular maintenance, Danish oil can still be useful.
Credit: priorypolishes.co.uk
Final Thoughts
Danish oil is not a magic solution for all wood finishing needs. Its natural look and easy application have clear appeal, but the disadvantages are real and sometimes costly. Beginners often miss the need for regular maintenance, the limited protection, and the safety risks with oily rags. For kitchen tables, bathroom furniture, or outdoor projects, better alternatives exist. But for small, decorative, or low-wear items, Danish oil remains a simple and attractive choice—if you go in with eyes open.
For more technical details and product comparisons, see this Wikipedia article on Danish oil.
Frequently Asked Questions
What Is The Main Disadvantage Of Danish Oil?
The main disadvantage is limited surface protection. Danish oil does not form a thick, durable film, so it is easily damaged by water, heat, and heavy use. Frequent maintenance is needed to keep the wood protected.
Can I Use Danish Oil On Kitchen Countertops?
It is not recommended for kitchen countertops. Danish oil has poor water and stain resistance, and regular cleaning can remove the finish. Harder finishes like polyurethane are better for these surfaces.
Is Danish Oil Safe For Food-contact Surfaces?
Danish oil is only food-safe after it has fully cured, which can take up to 30 days. Until then, it may transfer chemicals or odors to food. For immediate use, choose a finish labeled food-safe.
How Often Do I Need To Reapply Danish Oil?
You should reapply Danish oil every 6–12 months on surfaces that see regular use. High-traffic areas may need touch-ups more often, especially in humid environments.
What Should I Do With Oily Rags After Using Danish Oil?
Oily rags can catch fire if not handled properly. Lay them flat outside to dry, or store them in a sealed, water-filled metal container until you can dispose of them safely. Never leave oily rags in a pile indoors.