Danish oil is often praised for its natural look and easy application, but how well does it actually protect wood? Many people use it for furniture, floors, and even outdoor projects, expecting strong, long-lasting results. But before you commit to using Danish oil, it’s smart to understand how it works, what it’s best for, and its limitations.
Let’s take a deep look at Danish oil’s protective abilities, how it compares to other finishes, and the real-world performance you can expect. You’ll also find practical advice and insights that go beyond the basics, helping you avoid mistakes and get the most from your wood finishing projects.
What Is Danish Oil?
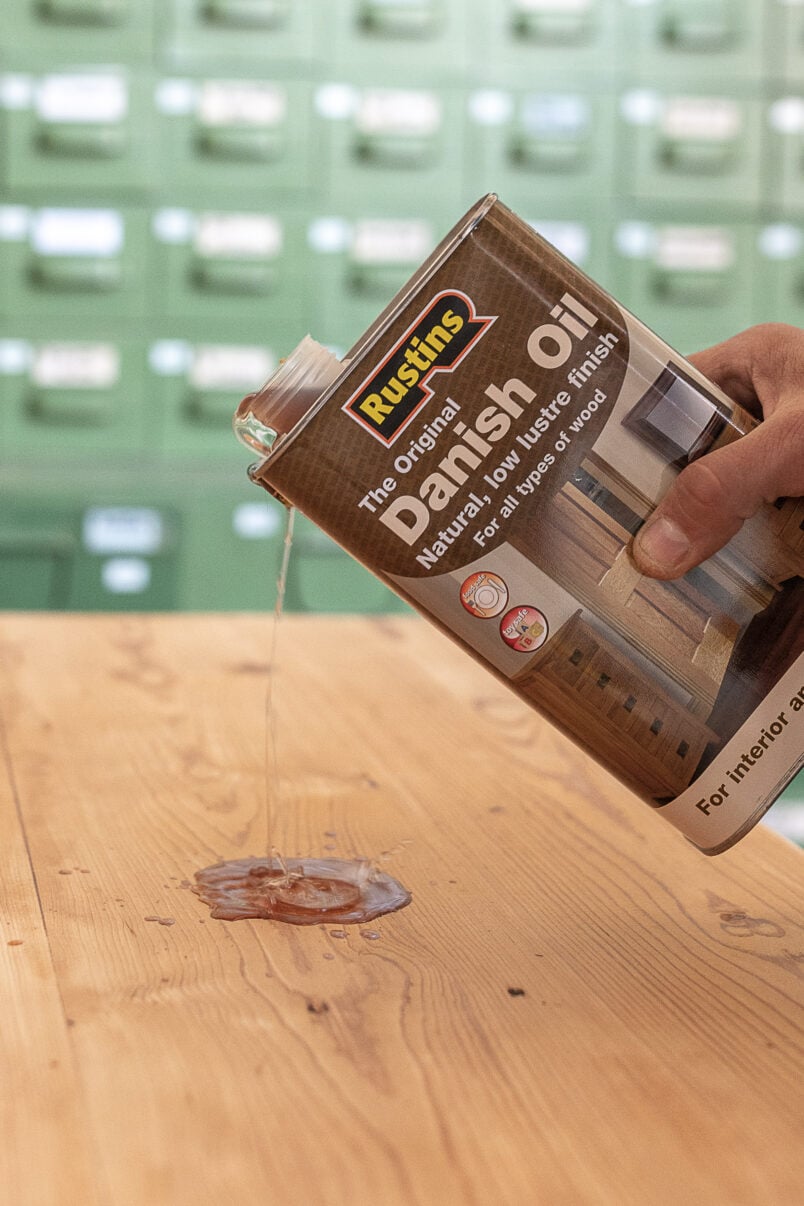
Danish oil is a wood finish made from a mix of oil (usually tung or linseed oil), varnish, and sometimes solvents. Its main purpose is to protect wood while keeping a natural, hand-rubbed look. Danish oil is known for soaking into the wood, hardening, and providing a low-sheen finish.
Unlike thick coatings that sit on top of the wood, Danish oil penetrates into the fibers. This quality gives it a warm, rich appearance and makes the grain “pop. ” The finish is smooth, not glossy, and feels pleasant to the touch.
For people who like to feel the texture of wood without a plastic-like surface, this is a big advantage.
Danish oil has been used for decades, and its popularity comes from its balance of protection and beauty. Unlike paints or lacquers that cover the wood, Danish oil lets the wood’s character show through. This is why it’s often chosen for fine furniture and projects where the look of the wood is important.
Common Danish Oil Ingredients
- Tung oil or linseed oil: These are natural oils that soak into wood and harden, giving the wood a richer color and some internal strength.
- Varnish: Adds durability and some water resistance by forming a thin, protective layer on the surface.
- Mineral spirits or similar solvents: Help the oil penetrate and dry faster, making the application process smoother.
The exact recipe can vary between brands, but the goal is always to combine deep penetration with a bit of surface protection. Some Danish oils also include drying agents to speed up the curing process, which can affect the final look and how quickly the finish is ready for use.
Many woodworkers make their own Danish oil by mixing oil and varnish, adjusting the formula to suit the wood and the desired look. This flexibility is part of Danish oil’s appeal for both beginners and experts.
How Danish Oil Protects Wood
Danish oil’s protective power comes from two main actions:
- Penetration: The oil soaks into the wood, filling tiny pores and hardening inside. This helps strengthen the wood fibers and blocks some moisture.
- Surface Film: The varnish component leaves a thin, hard layer on the surface. It’s not as thick as polyurethane, but it adds extra protection.
This dual action gives Danish oil its reputation for enhancing wood’s natural beauty while offering moderate protection. It’s a bit like putting on a comfortable jacket: it shields the wood without hiding its appearance.
When Danish oil is absorbed, it forms a bond with the wood fibers. This makes the surface less likely to absorb moisture or stains quickly. The thin film on top gives a slight barrier against scratches and spills, but it’s not meant for heavy-duty use.
Types Of Protection Provided
- Water resistance: Danish oil can repel water for short periods, but isn’t fully waterproof. For example, a quick spill can be wiped up with no problem, but leaving water for an hour or more can cause damage.
- Stain resistance: Spills are less likely to soak in immediately, but need quick cleaning. This means you have a little time to react, but not much.
- Scratch resistance: The thin film helps resist light scratches, but heavy impacts can still mark the wood. Moving heavy objects or dragging sharp items can leave visible marks.
- UV resistance: Minimal; Danish oil does not protect well against sunlight unless additives are included. Sunlight can fade the finish and the wood if left unprotected.
One thing many people miss is that Danish oil’s protection is not just about the surface. Because it soaks in, it helps the wood resist swelling and shrinking from humidity changes—important for things like table tops or doors that might otherwise warp.

Credit: www.amazon.com
Comparing Danish Oil To Other Wood Finishes
To see how Danish oil stacks up, it helps to compare it with other popular finishes. Here’s a side-by-side look at the main types:
| Finish | Protection Level | Look & Feel | Ease of Application | Best Uses |
|---|---|---|---|---|
| Danish Oil | Moderate | Natural, low sheen | Easy | Furniture, indoor wood, low-traffic surfaces |
| Polyurethane | High | Glossy or satin, thicker film | Moderate | Floors, tabletops, kitchen surfaces |
| Lacquer | High | Glossy, smooth, hard | Moderate/Difficult | Cabinets, musical instruments |
| Shellac | Low-Moderate | Warm, natural, glossy | Moderate | Antiques, decorative pieces |
| Wax | Low | Soft sheen, silky feel | Easy | Touch-ups, over oil finishes |
Danish oil offers a middle ground: more protection than wax or plain oil, but less than film finishes like polyurethane or lacquer.
For example, if you want a super-tough surface for a kitchen countertop, polyurethane is a better choice. But if you want a finish that is quick to apply, easy to repair, and keeps the wood’s natural look, Danish oil is hard to beat.
One thing to note is that Danish oil is often preferred for projects where the feel and warmth of the wood are important, such as handcrafted furniture.
How Well Does Danish Oil Repel Water?
Water is a major enemy of wood. So, how much does Danish oil help?
Danish oil forms a water-resistant barrier. If you spill water on a Danish oil finish, it will bead up for a short time, giving you a chance to wipe it away. However, if water sits on the surface for more than a few minutes, it can start to soak in, leading to stains or swelling.
A study done by woodworking experts showed that Danish oil could protect wood from water rings for up to 10-20 minutes. After that, the risk of damage increases. In comparison, polyurethane can resist water for hours or even days.
Real-world Example
If you use Danish oil on a dining table, a quick spill of water or coffee probably won’t harm it—if you clean it up fast. But a forgotten glass left overnight can leave a white ring or stain.
Another example is using Danish oil on window sills. Occasional water drops from condensation are usually fine, but a plant pot left too long can leave a permanent mark. This is why Danish oil is best for surfaces that are not exposed to constant moisture.
A non-obvious insight: water resistance can sometimes be improved by applying a coat of wax over Danish oil. The wax adds another layer that slows water penetration, but it also needs to be renewed regularly.
Credit: www.littlehouseonthecorner.com
Danish Oil And Everyday Wear
Wood surfaces get scratched, scuffed, and dented over time. Danish oil offers some defense, but it’s not as tough as finishes that build up a thick coat.
Scratch Resistance
Danish oil’s thin film helps protect against light scratches—such as from sliding plates or books. But heavy use, like dragging metal objects or using the surface as a cutting board, will leave marks.
Unlike harder finishes, Danish oil does not prevent dents from impacts. For example, if you drop something heavy on a Danish oil-finished floor, the wood will still compress. However, small scratches are often less visible because the finish is inside the wood, not just on top.
Heat Resistance
Danish oil is not highly heat-resistant. Hot cups or pans can cause rings or blushing (cloudy spots) if left directly on the surface.
To reduce the risk of heat damage, always use coasters or pads under hot objects. If a heat mark does appear, sometimes a light sanding and reapplication of oil will fix the problem.
Chemical Resistance
The finish offers mild resistance to alcohol and household cleaners. However, strong chemicals or constant cleaning will wear down the oil quickly.
For example, wiping with strong cleaners like bleach or ammonia can dull the finish or remove it completely. It’s best to clean Danish oil surfaces with a damp cloth and mild soap, then dry immediately.
Outdoor Use: Can Danish Oil Handle The Elements?
Some people use Danish oil on outdoor projects like garden furniture or decks. But is it a good idea?
Danish oil is designed mainly for indoor use. Outdoors, sunlight, rain, and temperature changes will break down the oil quickly. UV rays cause the finish to fade and wood to gray. Rain and humidity can lead to swelling, warping, or mold.
If you do use Danish oil outside, remember that it’s a temporary solution. The finish will need frequent reapplication, and the wood may still suffer from the elements over time. For garden benches under a covered porch, Danish oil can work if you’re willing to maintain it, but for exposed decks, it’s not a good choice.
Improving Outdoor Performance
If you want to use Danish oil outdoors:
- Reapply the oil every 2-3 months, or whenever water stops beading.
- Add a UV-protective topcoat, such as spar varnish, for better sun resistance.
- Use Danish oil only on covered or sheltered outdoor areas.
- Consider combining Danish oil with a high-quality outdoor oil for improved results.
Still, Danish oil cannot match the protection of specialized outdoor finishes like marine varnish or deck sealers. These are designed to withstand harsh weather and need less frequent maintenance.
Application Process And Its Impact On Protection
How you apply Danish oil affects how well it protects. Applying it correctly ensures the best results.
Steps For Applying Danish Oil
- Prepare the wood: Sand to a smooth finish and remove dust. The smoother the wood, the more even the finish will be. Use finer sandpaper for the last sanding step.
- Apply the oil: Use a clean cloth or brush to spread a generous coat. Make sure to cover the surface evenly and get into any corners or details.
- Let it soak: Allow the oil to penetrate for 15-30 minutes. The wood should look wet, not dry.
- Wipe off excess: Remove any oil that hasn’t soaked in. This prevents sticky spots and helps the finish dry evenly.
- Repeat: Add 2-3 coats, letting each dry for several hours. Each new coat fills in any missed spots and increases the protective layer.
- Final buffing: Once dry, buff the surface with a soft cloth. This gives a smooth, satin feel and helps remove any residue.
Each coat adds a bit more protection, but more than 3 coats usually doesn’t help much. Too many coats can leave a sticky, uneven finish. It’s better to keep the coats thin and even.
Drying Time And Curing
Danish oil dries to the touch in 4-8 hours, but it can take up to 30 days to fully cure (harden). During this time, avoid heavy use or exposure to water.
A beginner often misses that if you use the surface before the oil is cured, you can leave fingerprints or marks that are hard to remove later. Patience during curing is important for the best results.
Maintenance: Keeping Danish Oil Protection Strong
Danish oil is easy to refresh, which is one of its biggest strengths. Over time, the finish will wear down, especially on busy surfaces. Regular maintenance keeps the wood looking good and protected.
When To Reapply
- When water no longer beads on the surface
- When the finish looks dull or dry
- After heavy cleaning or sanding
- When you notice the wood feeling rougher or looking patchy
Simply wipe on a new coat, let it soak, and buff off the excess. There’s no need to fully strip the old finish unless it’s badly damaged.
A non-obvious tip: before reapplying, lightly sand the surface with fine sandpaper (like 320 grit). This opens the pores and removes minor scratches, helping the new oil soak in and bond better.
Cleaning Tips
- Use a damp (not wet) cloth for everyday cleaning.
- Avoid harsh cleaners or soaking the wood.
- For stubborn stains, use a little mild soap and water, then dry quickly.
- For added shine, buff with a soft cloth or apply a thin layer of wax.
Where Danish Oil Works Best
Danish oil is ideal for certain projects. Knowing when to use it—and when to choose something else—makes all the difference.
Best Uses
- Indoor furniture: Tables, chairs, desks, bookcases. The finish gives a warm, inviting look and is easy to keep up.
- Wooden bowls and utensils: Safe after curing, but avoid long soaking. The finish feels natural and is food-friendly when fully dry.
- Low-traffic flooring: Bedrooms or formal rooms where wear is light.
- Decorative items: Picture frames, sculptures, clocks, and other objects that don’t get a lot of handling.
You can also use Danish oil for musical instruments, jewelry boxes, and other small woodworking projects where you want to highlight the grain and color of the wood.
Where To Avoid Danish Oil
- Kitchen countertops: Too much water and scrubbing wear out the finish quickly.
- Bathroom surfaces: High humidity can break down the oil and invite mold.
- Outdoor decks: Sun and rain will break down the finish fast, leading to gray, weathered wood.
- High-traffic floors: Not durable enough for daily shoes and heavy movement.
For these places, a tougher finish like polyurethane, marine varnish, or a high-build epoxy is a better choice.
Danish Oil Performance: Data And Test Results
Manufacturers and woodworkers have tested Danish oil in different conditions. Here’s a summary of key findings:
| Test | Danish Oil Result | Polyurethane Result | Wax Result |
|---|---|---|---|
| Water spot resistance (20 min) | Minor mark | No mark | Clear stain |
| Scratch with coin | Light scratch visible | No visible scratch | Deep scratch |
| Alcohol spill (1 min) | Slight dulling | No change | Severe stain |
| Sunlight exposure (1 month) | Finish faded | No change | Finish faded |
This data shows Danish oil does offer real protection, but its limits are clear compared to high-build finishes. In practice, Danish oil is a great choice for beauty and moderate protection but not for heavy-duty or outdoor use.
Common Mistakes When Using Danish Oil
Many beginners make errors that reduce the protection Danish oil offers. Avoid these common problems:
- Using too few coats: One coat isn’t enough. Apply at least two or three for a complete finish.
- Not wiping off excess: Leaving oil on the surface causes sticky, uneven spots that attract dust.
- Skipping sanding: Rough wood won’t absorb the oil evenly and will look patchy or dull.
- Applying over old finishes: Danish oil works best on bare wood, not on top of varnish or paint. Old finishes block the oil from soaking in.
- Not allowing enough drying time: Handling the wood too soon can ruin the finish and cause marks.
Another mistake is using Danish oil in a cold or humid environment, which can slow drying and curing. Always check the weather and room conditions before starting your project.
By following the correct process, you get the best from Danish oil.
Two Insights Beginners Often Miss
1. Danish oil isn’t a “set and forget” finish. Many people think one application will last for years. In reality, Danish oil needs regular maintenance—sometimes every few months for busy surfaces. This is different from polyurethane or lacquer, which can last many years without attention.
2. Not all “Danish oil” products are the same. Some brands use more varnish, others more oil, and some add drying agents or pigments. Always check the product label and try on a sample piece of wood first. The results can look and feel very different depending on the formula.
A less obvious point: Some Danish oils are labeled as “natural” but may contain solvents or additives. If you want a true natural finish, check the ingredients carefully or make your own blend.
Credit: www.furnitureclinic.co.uk
Environmental And Health Considerations
Danish oil is safer than many solvent-heavy finishes, but you should still use it with care.
- Ventilation: Apply Danish oil in a well-ventilated area to avoid breathing in fumes. Open windows or use fans to keep air moving.
- Disposal: Oily rags can self-ignite. Always spread them flat to dry or store in a sealed metal container. Never throw oily rags in the trash right away.
- Food safety: Once cured, Danish oil is generally safe for items like salad bowls and cutting boards, but always check the product for food safety approval.
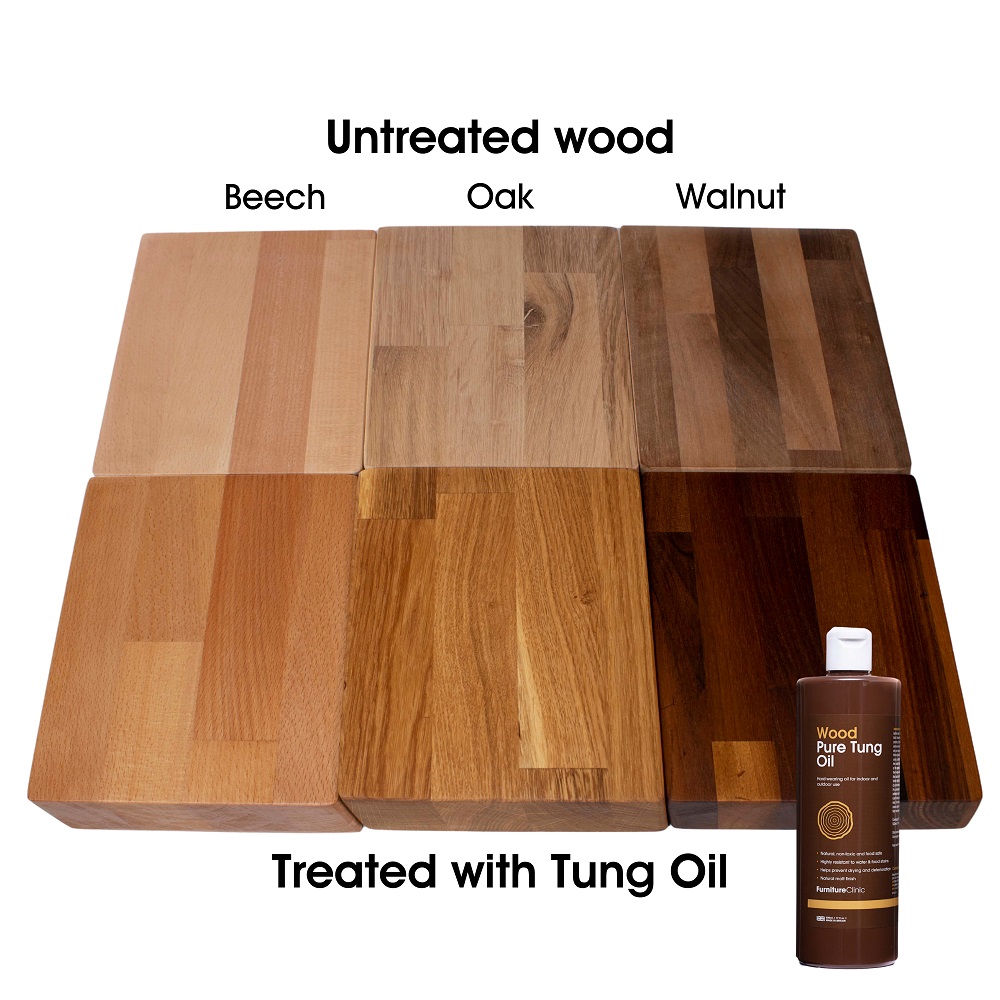
Some brands now offer low-VOC or eco-friendly options. If you are sensitive to chemicals, look for these products or choose pure tung oil as an alternative.
Tips For Getting The Best Protection
- Test on scrap wood first to check color and finish. Different woods react differently to oil.
- Apply thin, even coats for better penetration and drying. Thick coats can stay sticky.
- Let each coat dry fully before adding the next. Rushing leads to a soft finish.
- Buff the final coat for a smooth, attractive sheen and to remove any residue.
- Combine with wax for extra surface protection, especially on tabletops. Wax can be renewed often and gives a nice feel.
A bonus tip: If you want to deepen the color even more, use a tinted Danish oil or apply a wood stain first, making sure it’s fully dry before oiling.
Danish Oil In The Modern Woodworking World
Today, Danish oil remains a favorite for DIYers and professional woodworkers who want a balance of natural beauty and moderate protection. Its easy application and repair make it a smart choice for many projects.
More advanced finishes, like hybrid oils or hardwax oils, are becoming popular for those who want more durability with the same look. Still, Danish oil holds its place for classic, hand-rubbed furniture.
For more technical information, you can read about wood finishing oils at the Wikipedia Wood Finishing Oil page.
Frequently Asked Questions
How Long Does Danish Oil Last On Wood?
Most Danish oil finishes last 6-12 months on surfaces that get daily use, like tables or desks. For decorative items, it can look good for several years. Regular maintenance—wiping on a new coat when the finish looks dull—helps keep protection strong.
Is Danish Oil Food Safe?
Once fully cured (usually after 30 days), most Danish oil products are food safe for items like salad bowls or wooden utensils. Always check the label to make sure, as some brands may use additives that are not safe for food.
Can You Put Danish Oil Over Stained Wood?
Yes, you can use Danish oil over wood that has been stained, as long as the stain is completely dry and does not leave a surface film. Avoid using Danish oil over polyurethane or thick varnish, as it cannot penetrate or bond well.
How Many Coats Of Danish Oil Are Needed For Best Protection?
For most projects, 2-3 coats of Danish oil give good protection. More coats may not add much benefit and can make the finish sticky. Each coat should be thin and allowed to dry fully before adding the next.
Does Danish Oil Change The Color Of Wood?
Danish oil will darken wood slightly and bring out the grain, making colors richer. Some brands offer tinted versions for a deeper tone. Always test on a hidden area or scrap piece to see the final color before treating your main project.
Danish oil is a smart, classic choice for people who want wood to look and feel natural while still being protected. It’s easy to use, easy to repair, and gives wood a warm, rich appearance. If you understand its strengths and limits, and keep up with regular care, Danish oil can keep your wood looking beautiful for years.
But for the highest traffic, wettest, or outdoor areas, consider a tougher finish. The best protection always comes from matching the finish to your project’s real-world needs.