Cutting a taper on a table saw is a classic woodworking skill that can elevate your projects from simple to refined. Tapered legs, angled edges, and custom shapes often make furniture and cabinetry stand out. While the process might look intimidating at first, learning how to cut a taper on a table saw is both achievable and safe when you follow the right steps.
This guide walks you through everything you need to know, from planning the cut to advanced tips, helping both beginners and experienced woodworkers create precise tapers with confidence.
What Is A Taper And Why Cut One?
A taper is a piece of wood that gradually becomes narrower or thinner from one end to the other. Tapers are used for both function and style. For example, tapered legs make tables look lighter and more elegant, while a tapered edge can help a door close smoothly. Sometimes, tapers are necessary for fitting parts together or reducing weight.
Cutting a taper on a table saw is efficient because the tool provides control and accuracy. While hand tools or band saws can also make tapers, the table saw is usually the fastest and most repeatable method, especially when you need several identical pieces.
Tools And Materials Needed
Before you start, gather all the tools and materials. Having everything ready will help you work safely and avoid mistakes.
Essential Tools
- Table Saw – The main tool for making straight, accurate cuts.
- Tapering Jig – A device that holds your workpiece at the right angle. You can buy one or make your own.
- Push Stick or Push Block – Keeps your hands safe when feeding wood through the saw.
- Measuring Tape or Ruler – For marking your taper lines precisely.
- Pencil or Marking Knife – For drawing the taper line.
- Clamps – Useful when building your own jig or for extra safety.
- Safety Gear – Always wear safety glasses and hearing protection.
Materials
- Workpiece – The wood you want to taper.
- Scrap Wood – For testing cuts or building a jig.
Optional Extras
- Featherboards – To hold the wood tightly against the fence.
- Double-sided Tape – For attaching the workpiece to a homemade jig.
- Stop Block – To ensure repeatable cuts.

Credit: www.youtube.com
Understanding Table Saw Taper Jigs
The tapering jig is the secret to safe, accurate tapers. A jig holds the wood at an angle so the saw blade removes the right amount as you push it through. There are several types of jigs, each with pros and cons.
Types Of Taper Jigs
| Taper Jig Type | Adjustability | Skill Required | Cost |
|---|---|---|---|
| Commercial Adjustable Jig | High | Beginner | Medium-High |
| Homemade Jig (Hinged Board) | Medium | Intermediate | Low |
| Sliding Sled Jig | High | Intermediate | Medium |
| Simple Fence Guide | Low | Advanced | Low |
Commercial Adjustable Jig
This is the most beginner-friendly. It has preset angles, clamps, and clear markings. You simply adjust the angle and secure your wood.
Homemade Jig
A basic homemade jig uses two boards connected with a hinge. You set the angle by adjusting the boards. It is cost-effective but needs careful setup.
Sliding Sled Jig
A sliding sled rides in the table saw’s miter slot. It holds your workpiece firmly and glides past the blade. This is accurate but takes time to build.
Simple Fence Guide
Advanced users sometimes use the fence as a guide and angle the wood manually. This method is fast but riskier and less repeatable.
Non-obvious insight: Even a simple jig can give professional results if set up carefully. The key is holding your workpiece securely and guiding it smoothly.
Planning Your Taper
Start with clear goals. Decide exactly where the taper begins and ends. Planning avoids mistakes and wasted material.
Steps For Planning
- Decide the Start and End Points – Measure the full length of your workpiece. Mark where the taper will begin (the wide point) and where it will end (the narrow point).
- Mark the Taper Line – Use a straightedge to connect your start and end marks. This line shows exactly where to cut.
- Determine the Amount to Remove – Measure how much wood you want to take off. For example, if you want one end 1 inch narrower, the taper removes half an inch from each side.
- Plan for Multiple Cuts – If you need more than one tapered edge, decide the order. For table legs, often two adjacent faces are tapered.
Example
Suppose you want to make a table leg that starts at 2 inches wide at the top and tapers to 1 inch at the bottom over a 30-inch length. Mark the 2-inch width at the top, the 1-inch width at the bottom, then connect the dots.
Repeat for all sides that will be tapered.
Non-obvious insight: Always leave a little extra length for mistakes. You can trim the piece to final length after cutting the taper.
Setting Up The Table Saw
Safety and accuracy start with good setup. Follow these steps before making any cuts.
Adjust The Blade
Set the blade height slightly higher than the thickness of your wood. This makes a clean cut and avoids burning.
Position The Fence And Jig
If you’re using a jig that rides against the fence, lock the fence in place. Position your jig so the blade will follow your marked taper line.
Check For Clearance
Do a dry run with the saw off. Slide your setup through the saw to make sure nothing hits the blade, fence, or table.
Set Up Safety Devices
- Place your push stick nearby.
- Attach featherboards if using.
- Make sure your safety gear is on.
Tip: Never reach over the blade. Always stand to the side.
Cutting A Taper With A Commercial Jig
A commercial taper jig is the simplest for beginners. Here’s how to use one safely and accurately.
Step-by-step Instructions
1. Set The Jig Angle
Adjust the jig to the angle that matches your taper line. Most jigs have a scale, but check with your own measurements.
2. Secure The Workpiece
Clamp or lock the wood onto the jig. Make sure the waste side (the part you’re removing) is facing the blade.
3. Align The Jig With The Blade
Move the jig and wood together against the fence so the blade lines up with your taper line.
4. Double-check Everything
Confirm your hands will stay clear of the blade during the cut. Do a dry run if unsure.
5. Make The Cut
Turn on the saw. Push the jig and wood slowly and steadily through the blade. Keep pressure even.
6. Finish And Inspect
Once through, turn off the saw. Check your cut for smoothness and accuracy.
Tips For Success
- Use a push stick if your hand gets close to the blade.
- Don’t force the wood; let the blade do the work.
- Double-check your jig’s clamps before each cut.
Common beginner mistake: Forgetting to secure the wood tightly. Loose workpieces can shift and ruin the cut.
Cutting A Taper With A Homemade Jig
Making your own jig is budget-friendly and flexible. Here’s how to create and use a basic hinged-board jig.
Building The Jig
1. Cut Two Boards
Use plywood or straight, flat boards. One should be about as long as your workpiece.
2. Attach A Hinge
Connect the boards at one end with a sturdy hinge, so the angle can open and close.
3. Add A Stop Block
Screw or glue a small block on one board to keep your workpiece from sliding forward.
4. Optional: Add Clamps
Use clamps or bolts to hold the wood securely.
Using The Jig
1. Open The Jig To The Right Angle
Place your workpiece inside, adjust the boards to match your taper line, and lock in place.
2. Align With The Blade
Position the jig so the blade will cut along your mark.
3. Feed Through The Saw
Keep your hands clear and push the jig steadily.
4. Repeat For Multiple Tapers
If you need more than one side tapered, rotate the wood and reset the jig.
Pro tip: Label your jig for future use. If you make a table with four identical legs, you can reuse the setup for consistency.
Making A Taper With A Sliding Sled Jig
A sliding sled jig increases accuracy, especially for longer or heavier pieces. It also offers better safety.
How It Works
The sled rides in the miter slot of your table saw, holding the workpiece at an angle. The wood never touches the fence, reducing errors.
Steps To Use
1. Set Up The Sled
Adjust the sled’s fence to the taper angle you need.
2. Secure The Wood
Clamp the workpiece to the sled. Double-check that it won’t move.
3. Slide And Cut
Push the sled through the blade smoothly.
4. Check The Cut
Inspect for straightness and repeat if needed.
Advanced tip: For production work, add stop blocks to the sled so you can repeat cuts quickly and accurately.
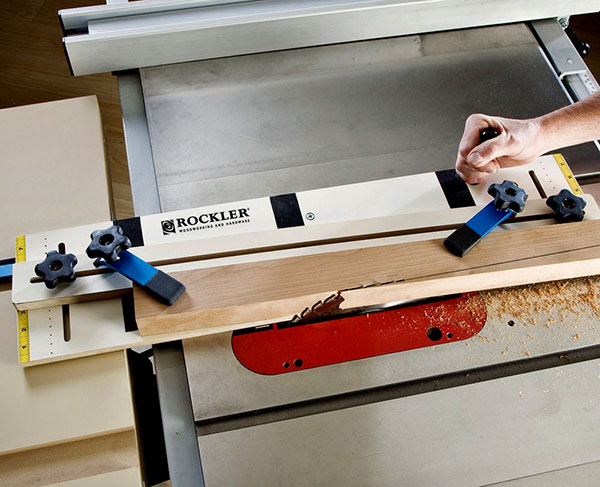
Credit: www.rockler.com
Safety Tips For Taper Cuts
Safety is more important than speed. Table saws can be dangerous, but smart habits prevent accidents.
1. Always Use A Jig
Never try to freehand a taper cut. The wood must be guided securely.
2. Keep Hands Clear
Use push sticks, push blocks, or handles attached to your jig.
3. Wear Safety Gear
Eye and ear protection are essential. Avoid loose clothing.
4. Check Your Setup
Inspect the jig, clamps, and blade before every cut.
5. Stand To The Side
Position yourself out of the path of kickback.
6. Turn Off The Saw Before Adjusting
Never reach near the blade unless the saw is unplugged and stopped.
7. Keep The Area Clean
Sawdust and scraps can cause slips or jams.
Non-obvious safety insight: Kickback is more likely with thin tapers. Always start with the wider end facing you.
Comparing Tapering Methods
It helps to see how different tapering methods compare in accuracy, ease, and repeatability.
| Method | Accuracy | Safety | Best For |
|---|---|---|---|
| Commercial Jig | High | High | Beginners, multiple pieces |
| Homemade Jig | Medium-High | Medium | Custom angles, small budget |
| Sliding Sled | Very High | Very High | Long pieces, production work |
| Fence Guide (no jig) | Low-Medium | Low | Experts only |
Fine-tuning And Finishing The Taper
A perfect taper looks smooth and feels even. After cutting, a few finishing steps can make a big difference.
Steps To Finish
1. Sand The Edge
Use a sanding block or power sander to remove saw marks. Start with 120 grit, then move to 180 grit.
2. Check The Angle
Use a bevel gauge or protractor to confirm your taper is accurate. Compare each piece if making multiples.
3. Trim To Final Length
If you left extra material, now is the time to cut the piece to its finished size.
4. Inspect For Burn Marks
Light burns can be sanded off. Heavy burns suggest the blade is dull or moving too slowly.
5. Apply Finish (optional)
For furniture parts, apply a sealer or stain before assembly.
Pro insight: Always test your finish on a scrap piece with a taper. Sometimes the edge absorbs stain differently.
Common Mistakes And How To Avoid Them
Even experienced woodworkers make errors. Here are the most frequent mistakes and solutions.
1. Not Securing The Workpiece
If the wood shifts, the taper will be uneven or unsafe. Always use clamps or a solid jig.
2. Measuring Incorrectly
Small errors in marking the taper line can ruin the piece. Double-check all measurements before cutting.
3. Using A Dull Blade
A dull blade causes burning and rough edges. Sharpen or replace the blade before starting.
4. Feeding Too Fast
Pushing too quickly can cause the blade to bind or the cut to wander. Move slowly and steadily.
5. Forgetting To Test The Setup
A dry run (with the saw off) shows if anything will bind or miss the line.
Non-obvious insight: Wood movement from humidity can change the fit of a taper. Store your wood in the shop for a few days before cutting.
Advanced Taper Techniques
Once you’re comfortable with basic tapers, you can try more advanced methods.
Tapering Multiple Sides
For table legs, many designs use tapers on two or all four faces. Mark each face, and after cutting the first taper, rotate the wood and repeat the process. Use a stop block for consistent results.
Compound Tapers
A compound taper changes width and thickness at the same time, creating a more complex shape. This requires a custom jig or careful planning. Cut one taper, then adjust the jig and cut the second angle.
Decorative Tapers
Some projects use tapers purely for style. You can adjust the angle for a subtle or dramatic effect.
Pro tip: When cutting compound tapers, label each face and keep a clear plan. It’s easy to get confused if you rush.
Troubleshooting Problems
If your taper isn’t perfect, here’s how to fix common issues.
Uneven Cuts
Check that your jig is set to the right angle and that the wood is clamped tightly. If the cut drifts, slow down and check for saw alignment.
Rough Edges
Use a higher-quality blade with more teeth. Also, check that your wood isn’t moving during the cut.
Blade Marks
Slight marks are normal, but deep ones suggest the blade is dull or you moved too fast.
Burn Marks
Go slower or switch to a sharp blade. Burns also mean the blade is too high or too low.
Taper Doesn’t Match Plan
Review your measurements. It’s common to mix up the wide and narrow ends, especially when making multiples.
:max_bytes(150000):strip_icc()/trueCutTaper20jig-db253eedfc624d4bae79b00e67460c7d.jpg)
Credit: www.woodmagazine.com
When To Use A Table Saw For Taper Cuts
A table saw is best for straight, repeatable tapers on longer pieces. Here’s when it’s the ideal tool:
- Table and chair legs
- Angled moldings
- Custom door or panel edges
- Frames requiring angled sides
For short, thick, or curved tapers, a band saw or hand plane might be better.
Real-world Example: Tapered Table Legs
Let’s walk through a practical example: making four tapered legs for a small table.
- Cut Stock to Size – Start with leg blanks that are slightly longer than needed.
- Mark Taper Lines – At one end, mark the finished width (e.g., 2 inches). At the bottom, mark the narrower width (e.g., 1 inch). Connect the marks.
- Set Up Jig – Use a commercial or homemade jig. Adjust for the taper angle and clamp the leg blank.
- Cut First Taper – Run the first side through the saw.
- Rotate and Repeat – Rotate the leg 90 degrees and cut the second taper.
- Check for Consistency – Compare all four legs. Sand and trim as needed.
This process gives you four identical legs with smooth, elegant tapers.
Taper Cutting Vs. Other Methods
How does the table saw compare to other tools for tapering?
| Tool | Best For | Pros | Cons |
|---|---|---|---|
| Table Saw | Straight, repeatable tapers | Fast, accurate, good for multiples | Needs jig, setup time |
| Band Saw | Curved or irregular tapers | Flexible, handles thick stock | Rougher cut, needs sanding |
| Hand Plane | Fine-tuning, short tapers | Quiet, no dust, traditional | Slow, skill required |
| Jointer | Long, shallow tapers | Very smooth finish | Limited taper length |
For most furniture projects, the table saw is the best choice for tapers due to speed and consistency.
Essential Maintenance For Taper Jigs
A well-maintained jig lasts longer and gives better results.
Maintenance Steps
1. Check For Wear
Replace parts that are worn or cracked.
2. Tighten Screws And Hinges
Loose parts can cause errors or accidents.
3. Clean The Jig
Remove sawdust and pitch buildup.
4. Store Properly
Keep the jig flat to avoid warping.
Pro tip: Label your jigs with the angles or projects they were used for. This saves setup time in future projects.
Where To Learn More
Cutting tapers is a foundation skill in woodworking. For more advanced tips, check out resources like the Popular Woodworking guide to tapering table legs.
Frequently Asked Questions
What Is The Safest Way To Cut A Taper On A Table Saw?
The safest way is to use a tapering jig that holds the workpiece securely. Never try to cut a taper freehand. Always use push sticks and wear safety gear. Make sure your setup is solid before turning on the saw.
Can I Cut A Taper Without A Jig?
It’s possible but not recommended. Cutting without a jig is risky and often leads to inaccurate results. A simple homemade jig can be built in minutes and greatly improves safety and precision.
How Do I Make Multiple Identical Tapers?
Use a stop block with your jig. After cutting the first piece, attach a stop block at the end position. This way, each new piece stops in the same spot, ensuring identical tapers.
What Blade Should I Use For Taper Cuts?
A sharp, high-tooth-count combination or crosscut blade works best. Avoid rough-rip blades, as they leave jagged edges. Make sure the blade is clean and sharp for smooth results.
What If My Taper Comes Out Uneven?
Check that your workpiece is clamped tightly and the jig is set correctly. Double-check your measurements and do a dry run before cutting. If the cut is still uneven, sand lightly or trim the edge with a hand plane.
Cutting a taper on a table saw is a key skill for any woodworker. With the right jig, good planning, and attention to safety, you can create professional-quality tapers for furniture, cabinets, and custom projects. Each new taper you cut will build your confidence and open new design possibilities.