Turning a circular saw into a table saw is a practical solution for many DIY enthusiasts and woodworkers. This transformation gives you the ability to make accurate, repeatable cuts without buying a dedicated table saw. For people with limited workshop space or budget, it’s a smart way to expand what your tools can do.
However, it’s not as simple as just flipping a saw over and attaching it to a board. Safety, stability, and accuracy are all vital. If you want to build a reliable and safe table saw from your circular saw, you need a careful step-by-step plan, the right materials, and some essential tips that many beginners miss.
This guide will walk you through the entire process in detail, from understanding why this conversion is useful, to choosing materials, building the table, mounting the saw, and ensuring safety. You’ll also learn about common mistakes, how to improve your homemade table saw, and what to do if something goes wrong.
By the end, you’ll have the confidence and knowledge to create a practical tool that’s both safe and effective.
Why Turn A Circular Saw Into A Table Saw?
Many hobbyists and professionals consider converting a circular saw into a table saw for several reasons. First, table saws are more expensive and take up more space. If your workshop is small or your budget is tight, a homemade table saw is a big advantage.
Second, a table saw allows for more precise cuts. With a fence and a flat table, you can make repeatable rips, crosscuts, and even bevels. For building furniture, shelves, or cabinets, these cuts are essential.
Finally, it’s about flexibility. If you already own a circular saw, why not get more from it? Making your own table saw setup also teaches you about tool mechanics, which can help you in other projects.
But the most important reason is control. With a table saw, the wood moves while the saw stays in place. This makes it easier to handle long or large pieces of wood.
What You Need: Tools And Materials
Before you start, gather all the materials and tools. Missing a key item can slow down the project, so check your list carefully.
- Circular saw – Any standard, corded circular saw works, but a saw with a flat base is best.
- Plywood or MDF – At least ¾-inch thick for strength. The table top should be flat and smooth.
- 2x4s or sturdy wood – For the table frame and legs.
- Screws and bolts – Quality wood screws (2-3 inches) and bolts for attaching the saw.
- Measuring tape and pencil – For accurate measurements and marking.
- Drill – With drill bits and driver bits.
- Jigsaw or handsaw – To cut openings for the saw.
- Clamps – To hold materials while working.
- Straightedge or level – Ensures everything lines up perfectly.
- Safety gear – Eye protection, hearing protection, and gloves.
You’ll also need a power strip or extension cord and a few optional items like a shop vacuum for dust control.
Table Of Essential Tools And Their Uses
| Tool | Purpose |
|---|---|
| Circular Saw | Main cutting tool |
| Plywood/MDF | Tabletop surface |
| 2x4s | Frame and legs |
| Drill | Holes for bolts/screws |
| Clamps | Hold parts during assembly |
Tip: Choose good quality plywood. Warped or low-grade boards can ruin the accuracy of your cuts.
Planning And Measuring
A good plan is the key to success. You’ll need to decide on the size of your table, the position of your saw, and where your fence will go.
Sizing Your Table
The table should be big enough to support the wood you cut, but not so big it’s hard to move or store. A common size for a small workshop is 2 feet by 4 feet. If you often cut large panels, go bigger.
Marking The Saw Location
Place your circular saw upside down on the plywood. Mark the outline of the base plate. The blade should be close to the center, but leave enough space for the fence on one side.
Non-obvious insight: Plan for the cord. Make sure the power cord won’t get in the way or drag across the cutting area.
Making A Fence Guide
A fence is what keeps your wood straight as you push it through the saw. Mark where your fence will go, but don’t attach it yet.
Building The Table Structure
Now it’s time to build a strong, stable table. The table must support both the saw and the wood you’ll cut.
Building The Frame
Cut four pieces of 2×4 to the length and width of your table top. Screw them together in a rectangle. Add more 2x4s across the middle for support.
Extra tip: Test the frame for wobble. Press on each corner and add diagonal braces if needed.
Attaching The Table Top
Place the plywood on the frame. Clamp it down, drill pilot holes, and screw it in place. Check that the surface is flat and level. Even a slight tilt can make your cuts crooked.
Adding Legs
Cut four legs from 2x4s (or thicker if you want). Attach each leg to the inside corners of the frame with screws. For extra stability, add horizontal braces between the legs.
Stability Comparison Table
| Frame Design | Stability | Ease of Building |
|---|---|---|
| Basic Rectangle | Medium | Easy |
| With Cross Braces | High | Moderate |
| Metal Frame | Very High | Difficult |
Cutting The Opening For The Saw
The most important part is cutting a precise opening for the saw blade.
Mark And Drill
Using your earlier marks, draw the outline of the saw’s base plate on the table top. Mark the spot where the blade will pass through the wood.
Drill a hole at each corner of the outline. These will help you start the jigsaw.
Cutting The Slot
With the jigsaw, cut out the rectangle. Go slowly to keep the cut straight. The opening should fit the saw’s base snugly, without wobbling.
Pro tip: Sand the edges of the opening. This prevents splinters and helps the saw sit flush.
Making A Blade Slot
With the saw upside down, lower the blade through the opening. The slot should be just wide enough for the blade to spin freely.
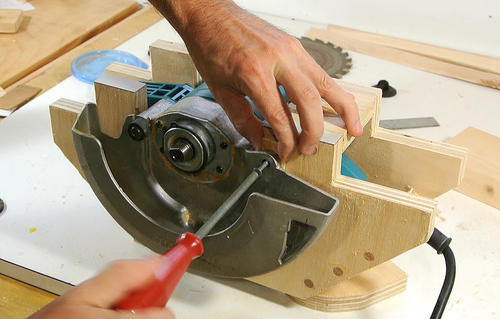
Mounting The Circular Saw
With the opening cut, it’s time to attach the saw. This step requires care to ensure the saw is safe and straight.
Positioning The Saw
Place the saw upside down into the opening. The blade should be centered in the slot. Adjust until the saw base is flush with the table surface.
Attaching The Saw
Most circular saws have holes in the base plate for screws or bolts. Mark these holes on the plywood. Remove the saw, drill pilot holes, then attach the saw using bolts or strong screws.
Important: Use washers so the screws don’t pull through the metal base plate.
Checking Alignment
The saw must be perfectly straight. If it’s even slightly crooked, your cuts will drift. Use a carpenter’s square or straightedge to check alignment with the table edge.
Non-obvious insight: Before tightening everything, check the blade is parallel to the fence area. If not, loosen the saw and adjust.

Credit: www.youtube.com
Making The Fence
A fence is essential for straight, accurate cuts. You can make a simple fence from a straight piece of wood, or build an adjustable system.
Simple Wooden Fence
Cut a straight 2×4 or strip of plywood. Attach it to the table with clamps or bolts. Measure carefully from the blade to the fence at both the front and back, so the fence is parallel.
Adjustable Fence
If you want more flexibility, you can add slots to the table and use bolts to adjust the fence position. Commercial clamps or tracks also work well.
Fence Accuracy Table
| Fence Type | Ease of Adjustment | Cut Accuracy |
|---|---|---|
| Clamped Wood | Low | Medium |
| Bolted Adjustable | Medium | High |
| Commercial Track | High | Very High |
Tip: If your fence moves during cutting, your wood will bind on the blade. Always double-check before each cut.
Safety Features And Best Practices
Converting a circular saw into a table saw is useful, but safety must come first. A homemade table saw is not as safe as a factory-built one, so take extra care.
Blade Guard
A blade guard protects your hands and keeps debris from flying. Some people make their own with clear plastic. Never use the saw without some form of guard.
Power Switch Location
Make sure you can reach the saw’s power switch or unplug it quickly. Some people add a foot switch or mount a power strip with a big button nearby.
Dust Collection
Circular saws make a lot of sawdust. If possible, add a shop vacuum or dust port under the table. This keeps your workspace clean and reduces health risks.
Push Sticks
Never use your hands to push wood through near the blade. Make or buy push sticks to keep your fingers safe.
Ear And Eye Protection
Always wear safety glasses and hearing protection. Homemade setups can be louder and throw off more debris than commercial table saws.
Non-obvious insight: Homemade tables can transmit vibration from the saw into the wood, causing rough cuts or kickback. Adding rubber washers under the saw base helps absorb vibration and makes your cuts smoother.
Cutting Techniques And Tips
With your saw mounted and fence ready, practice some basic cuts on scrap wood.
Rip Cuts
Set the fence the desired distance from the blade. Feed the wood slowly and steadily, keeping it flat on the table. Don’t force it through.
Crosscuts
You can add a crosscut sled or use a miter gauge. Always support the wood on both sides of the blade.
Bevel Cuts
If your saw tilts, you can make angled cuts. Adjust the tilt before mounting the saw, and double-check the angle with a protractor.
Common Mistakes
- Not checking alignment: Even a small error makes bad cuts.
- Using a dull blade: Always use a sharp, appropriate blade for wood.
- Forcing the wood: Let the saw do the work. Forcing increases the risk of kickback.
Improving Your Table Saw Conversion
Your first build might be simple, but there are many ways to improve it.
Adding A Miter Slot
A miter slot lets you use a miter gauge for angled cuts. Cut a straight groove in the table parallel to the blade.
Upgrading The Fence
Commercial fences (like Kreg or Biesemeyer) can be adapted to your table. They offer better accuracy and easier adjustment.
Outfeed Table
If you cut long boards, add a table behind your saw to support the wood as it exits the blade.
Mobile Base
Add locking casters to the legs so you can move the saw easily. Make sure they lock tightly for safety.
Power Upgrades
Use a dedicated circuit if your saw is powerful. Old extension cords can cause voltage drop and overheat.
Troubleshooting Problems
Even with careful building, problems can happen. Here’s how to solve the most common issues:
- Crooked cuts: Check that the saw is aligned and the fence is parallel to the blade.
- Wood burns or stalls: The blade may be dull or dirty, or you’re feeding the wood too slowly.
- Vibration: Add braces or rubber washers under the saw. Check the table for loose screws.
- Blade binds or stops: The opening may be too tight or the fence is not straight.
- Difficulty starting cuts: The blade may be too high or the wood isn’t supported.
Legal And Insurance Considerations
Homemade tools can be fun, but know the risks. If you injure yourself using a homemade table saw, some insurance policies may not cover it. Always follow local safety codes. And never let someone use your tool unless they know the risks.
For more on tool safety standards, check resources like the OSHA Woodworking Standards.
Credit: woodgears.ca
Maintenance And Care
A homemade table saw needs regular checks and cleaning.
- Check bolts and screws before each use.
- Clean the table surface to keep wood sliding smoothly.
- Inspect the power cord for damage.
- Lubricate moving parts on the saw as needed.
- Sharpen or replace blades regularly.
When To Upgrade To A Real Table Saw
A homemade table saw is great for occasional use or small projects. But if you do a lot of woodworking, you’ll eventually want a real table saw. Store-bought table saws have better safety features, more power, and more precise fences.
Signs you should upgrade:
- You cut hardwoods regularly.
- You need perfect accuracy for fine furniture.
- You want advanced features like dado cuts or built-in dust collection.
.jpg)
Credit: www.jumpusapark.com
Frequently Asked Questions
Can Any Circular Saw Be Used For This Conversion?
Most corded circular saws work, but the base should be flat and sturdy. Battery saws can work, but may lack power for long cuts.
Is A Homemade Table Saw Safe For Beginners?
It can be, if you follow all safety rules and never remove safety features. Always start with small projects to get used to the tool.
How Do I Make Sure My Fence Is Straight?
Measure from the blade to the fence at both the front and back. Adjust until both measurements match. Double-check before each cut.
Can I Cut Metal Or Plastic With This Setup?
Only if you use the right blade for the material. Most circular saws are designed for wood. Cutting metal or plastic can be dangerous without proper blades and safety gear.
What Should I Do If The Saw Vibrates Or Makes Loud Noises?
Stop immediately. Check for loose parts, dull blades, or uneven mounting. Tighten bolts, clean the blade, and check the table for flatness.
Turning a circular saw into a table saw can save money, teach you new skills, and help you complete more projects. With careful building, regular maintenance, and a focus on safety, your homemade table saw can serve you well for years.
But remember, always respect power tools and know when it’s time to invest in professional equipment as your skills grow.